Maker's March, the BGS-hosted month-long event encouraging participants to just make a dent in their project(s), wrapped up a week or two ago. I didn't make quite the dent I'd hoped for in my Picross XR project, but progress was indeed made.
Accomplishments
More Tutorial Layout
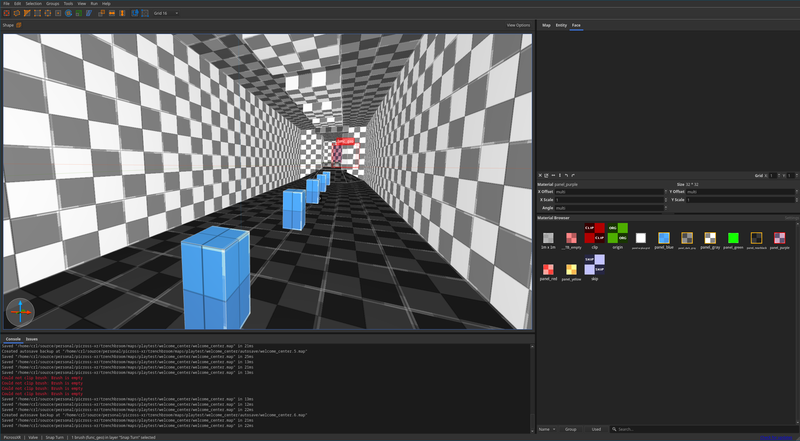
Something both wonderful and irritating about prototyping with a tool like
Trenchbroom
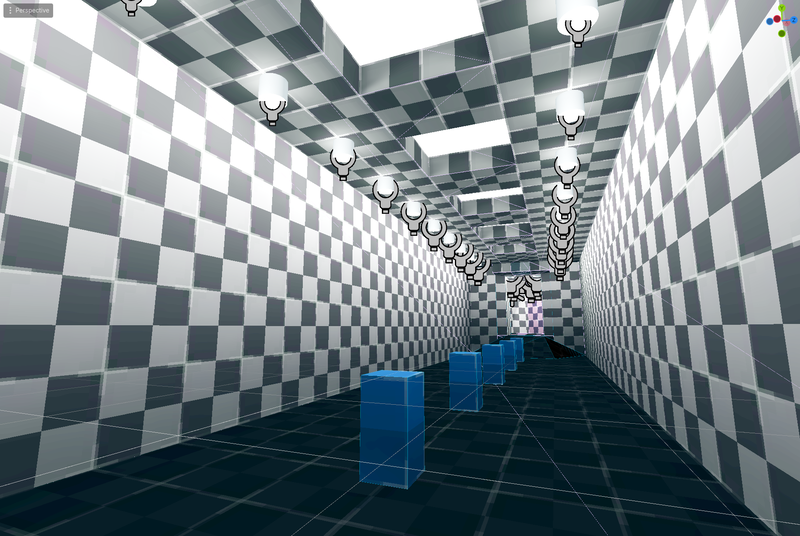
is that it's very easy to just get lost in making little tweaks to spaces. I did a fair bit of likely unnecessary modifications to this hallway in particular, rather than focusing on actual implementation work on logic or audio. Even so, the changes were improvements in my opinion. Space was broken up into clearer sections, lighting was improved, and some spaces that were just far too big for their own good were tightened up.
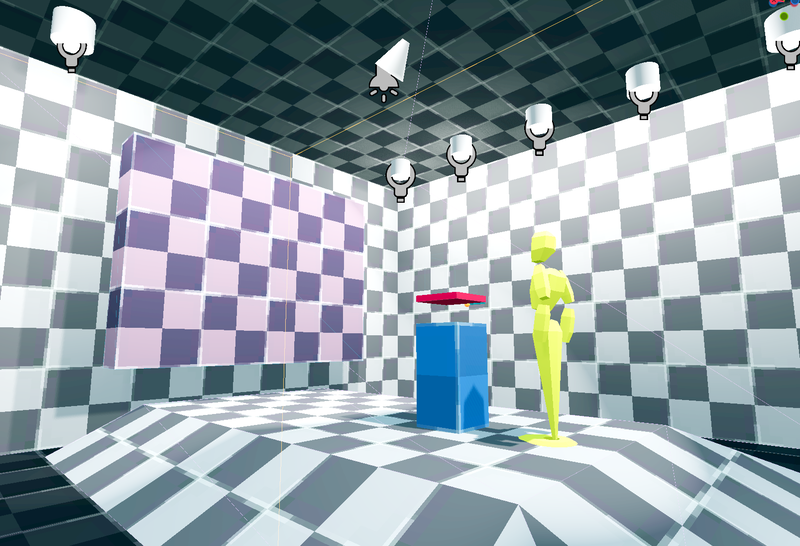
Also added was the example puzzles. Rather than try to explain how the puzzles and the hint system work via a graphic or some sort of voice-over, I decided to add pre-solved puzzles with their hints still visible to a portion of the level allowing players to examine them. The idea is by looking at a completed puzzle alongside it's hints, one will get a decent understanding of how the hints relate to the voxel positions. In a demo I presented at the end of Maker's March I received a couple of "ahhh, I get it now"s from attendees, so I think it's a step in the right direction.
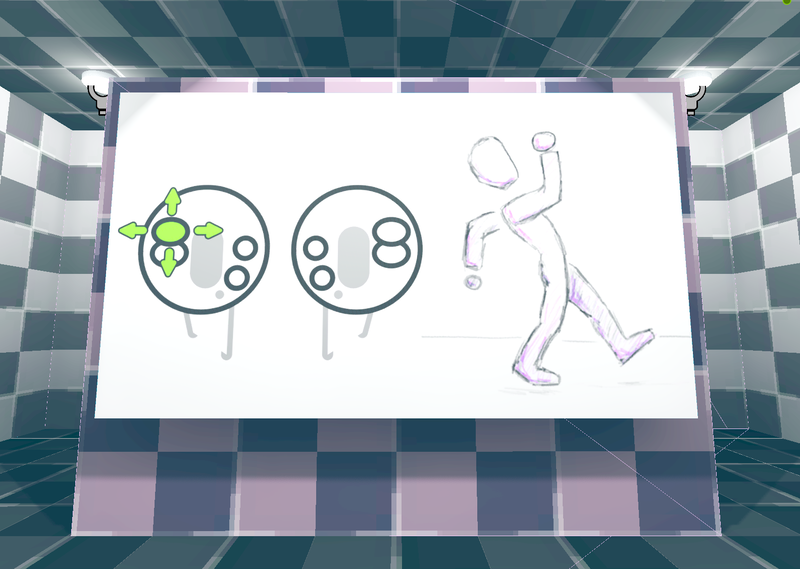
How-To Graphics
One thing I did want to utilize graphics for was basic interaction with the game. I'm not making any assumptions about a player's experience with VR as I think the general concept of this game can be enjoyed by anyone. Since there's a possibility this is the first time someone has interacted with a VR application, I want to be as explicit as I can regarding how to move around the virtual environment and how to interact with the puzzle components. I created some infographics presented as big billboards (even though the level design is modeled after a gallery, I am very hesitant to call any of these "art") and placed them throughout the space in a way where the player will see them and, ideally, has to understand them in order to progress through the tutorial level.
Next Up
Audio.
Audio audio audio.
It's always been the thing that's lacking in every project I make, and I know how crucial audio is to a game project because it's absence in mine is so blindingly (sonically?) painful. I have a shortlist of sound effects I need to put together, and I aim to get at least placeholders created and stuffed into the project this week. I firmly believe this will get the project into a playtestable state, and I refuse to playtest the project without it.
Beyond that, I plan to try out building an APK for sideloading onto the Quest 2 collecting dust in my office closet. I don't really want to release anything on a Meta platform, but I also have to accept that (a) there are more Meta headsets out there than anything else and (b) it's a hell of a lot easier to demo something at BGS with a Quest 2 than with my desktop/Valve Index. Not that I'm averse to dragging my home setup to the Space, but if I can fit it all in my backpack on my bike instead of dismantling my setup to toss in my car I will.
Maker's March '26 Devlog
Friday, April 03, 2026
This past week featured sketches, grayboxing, lighting, and haptic feedback implementation.
Accomplishments
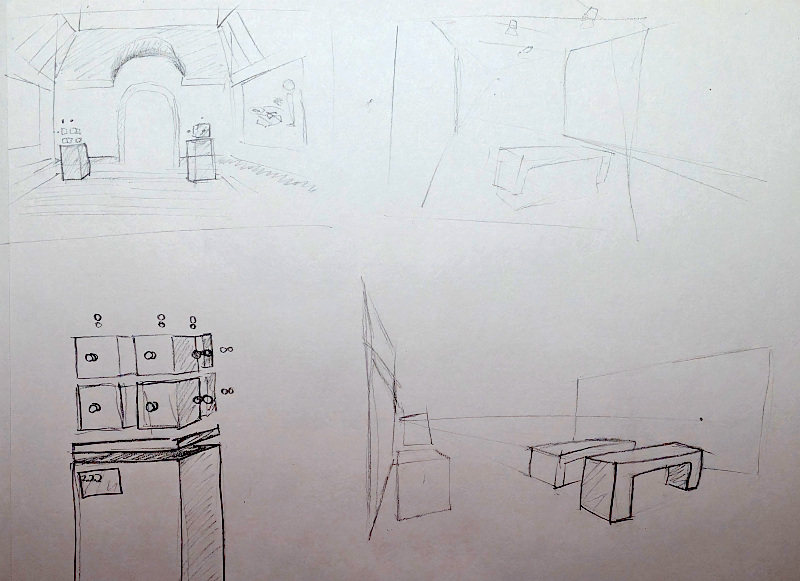
Sketch gallery concepts
This was more sketching the Welcome Center (tutorial area) than the gallery, but thematically I think the environments are going to be extremely similar. I found a number of gallery images I really liked and used them as a reference to do some quick still-lifes/studies of them.
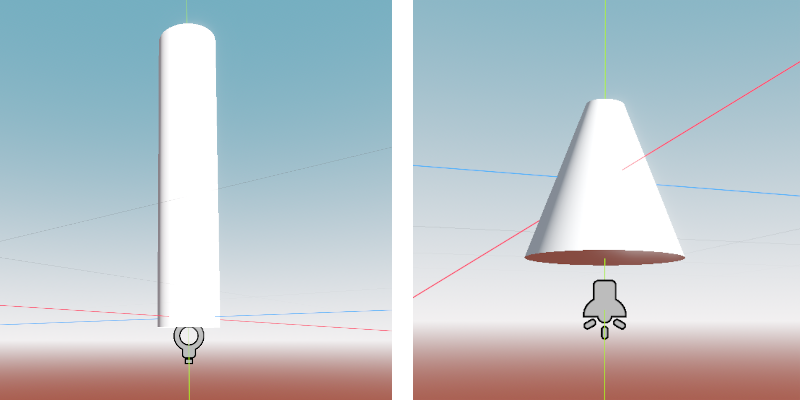
Graybox Tutorial
This got me excited about grayboxing, so I skipped ahead on the task list to start block out the tutorial area. While it's not complete yet (I've only mapped up to the first solvable puzzle area), it's already started to get a good feel in terms of navigation and space.
Something I had not thought of until really doing the sketching was how the area will be lit. Historically I've always prototyped "open air" levels. Spaces with no roof (or even walls), allowing the environment lighting to do all the heavy lifting. This was my first time working on an interior, and it's been educational so far. The current map uses a combination of Omni lights, Spotlights, and emmissive materials, all baked inside a LightmapGI. Utilizing FGD entities in Trenchbroom, I was able to create a "can light", "track light", and more general light texture for brushes (the omni, spot, and emmissive material, respectively) built into my prototyping workflow. I'm still manually baking the lightmap every time I modify the map, but a quick
@tool
script should automate that for me.
Haptic Feedback
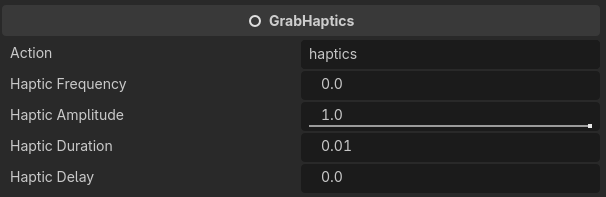
Last night during the virtual work session I hammered out most of the last bit of tasks for the week, which was implementing basic haptic feedback. First was grabbing, which I built using a general Node script
GrabHaptics
that fires off a haptic vibration on the controller grabbing a
Grabbable
node.
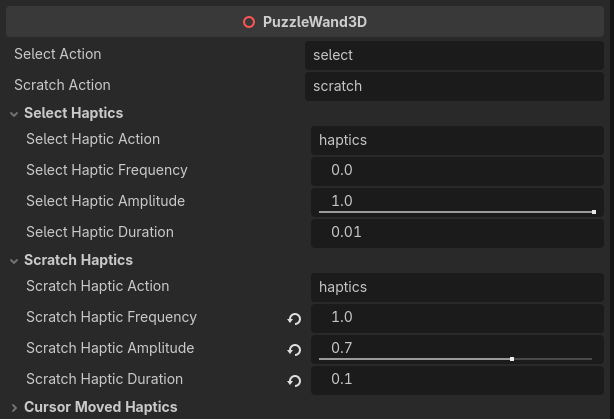
For the Wand, I wanted more response from a number of different events. In addition to adding a
GrabHaptics
node, the Wand script itself got a bunch of configurable haptic responses. There's currently different vibration options for adding voxels, adding/removing scratches, and moving the puzzle cursor between voxel spaces. That last one was way more important than I realized. During testing it really made it feel like I was directly interacting with something tangible instead of just moving a small box around a 3D grid.
Next Up
More grayboxing. Ideally, I'll have the tutorial area complete in the next few days (though this weekend is quite full with other happenings).
After that, I'll be starting work on the tutorial area graphics. I want to visually present the player with how navigation and puzzle interaction works in the game, avoiding things like text or spoken dialog. This might be the hardest thing to get right (especially around how puzzle interaction works), so most of the time working will be spent on these.
Lastly, I'll be creating the actual tutorial puzzles. This includes the static "sculpture puzzles" that will be on display in the tutorial area, seen by the player ahead of the first interactable puzzle.
Maker's March '26 - Kickoff and Early Days
Sunday, March 29, 2026
Buffalo Game Space is hosting a series of events in what they're calling "Maker's March". The idea is participants should pick a milestone they'd like to complete in a month, then work at it for said month. Along the way there's a series of in-person and virtual working sessions where folks can work on stuff, chat with one another, and provide a source of encouragement and motivation.
I love this idea. Like I said before, I find it hard to keep to self-set deadlines, so having others working on stuff too and setting public expectations on what I hope to achieve is a big motivator for me.
The Milestone
So what's my goal? I want to get a playtest build of my Picross VR project done and in players hands immediately following the end of the four-week period. So far there's only been a very small number of close friends and family that have played earlier prototypes of this game concept, and calling it a playtest is generous. Previously there was a room with a couple puzzles and a (arguably quite cool) virtual tablet that showed your time and puzzle selection options. Not really what I envisioned in total, and definitely not something that worked as a way to introduce people to the game concepts. It required a
lot
of explanation before I put the headset on someone.
So for this playtest, I want to create something that I can hand to a player and let them just figure it out. Something that teaches the player the mechanics organically, and requires next to no explanation from me on what it is they should be doing. Teaching the player how the puzzles work in particular is an interesting design problem, so that's what I'm taking a stab at first.
Latest Progress
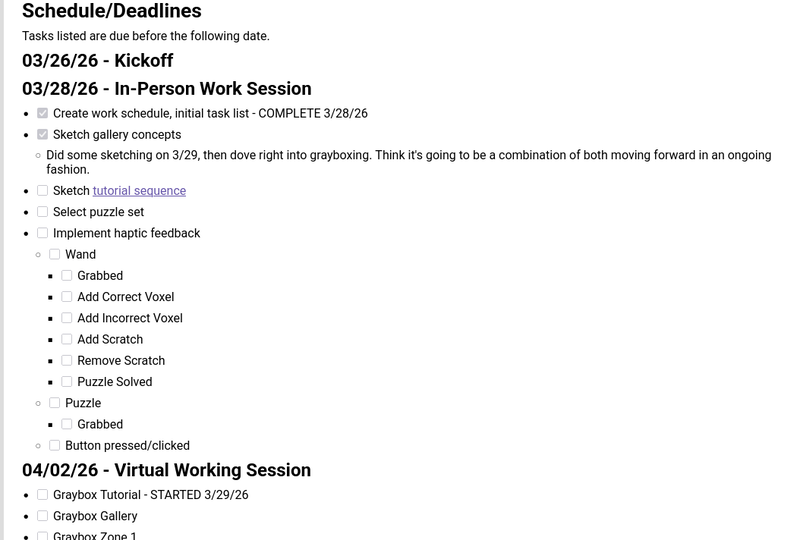
As of this writing, I've participated in the kickoff and the first in-person working session. My first priority was to come up with task list and break it down into sub-deadlines. This let me get everything I think I need to do written down, and by breaking it into sub-deadlines I was able to come up with very rough estimates on how long each task will take. It also helped me narrow scope, which is always key.
I set my tasking up in a
Feather Wiki
, which I'm a big fan of. It lets me document the project quickly, and the lightweight nature of Feather Wiki allows for including the wiki in the project repo. I created a new page for Maker's March and filled it with a checklist of tasks, broken down into due dates. So far I'm already skipping around, but hey, it's all got to get done and when one task flows into another who am I to say "no, gotta stick to the list".
The main focus of today's work was sketching out concepts for the Gallery and tutorial worlds. The Gallery is my planned hub world for the game, where the player can navigate from world to world. Each world will have a set of puzzles based on a theme. But before getting to that, I started grayboxing the Welcome Center, a portion of the Gallery that will serve as the tutorial area.
After looking up a number of photos inside different galleries and museums, followed by doing a couple thumbnail sketches, I started grayboxing the Welcome Center in
Trenchbroom
. Trenchbroom, in conjunction with
FuncGodot
, allows me to quickly prototype 3D environments for my game projects. I'm still pretty green when it comes to Trenchbroom, but I already enjoy it a lot for quickly spinning up something I can walk around in. I can make edits, build the map in Godot, jump into VR and walk around, then jump back to Trenchbroom to make edits super fast. I highly recommend it if you're interested in that sort of thing.
I've called it at a point today where the initial layout of the Welcome Center feels pretty good, building out the bones of the structure from the spawn point all the way to the first room in which the player will get to interact with a puzzle for the first time. Next items to wrap up before this Thursday are adding haptic feedback to the controller interactions, selecting puzzles for the tutorial, and likely some more grayboxing of the tutorial area.
Picross VR Devlog: Intro
Wednesday, March 25, 2026
For the last few months I've been getting back into a game project I initially started some two years(!) or so ago. It's a puzzle game in which you solve picross-like puzzles in 3D space. If you're unfamiliar, a
nonogram
is traditionally a 2D puzzle in which you create an image from clues on the edges of a grid. These historically have been in both print and video games (Nintendo has a number of Picross titles beginning on the Game Boy), but (almost) always presented in a 2D manner.
I can't pinpoint when I got the idea, but I'm sure it was inspired in part by the puzzle elements in Half-Life Alyx. I really enjoyed the minigames in which you're using the multitool to solve some sort of spatial puzzle to open a locker or upgrade station. It's the sort of gameplay that I feel only works in VR. I wanted to pursue that and see what I could come up with. One idea was this puzzle game, which I've decided to run with for the time being.
As I write this, I'm also getting ready for Buffalo Game Space's first "Maker's March", a month-long event encouraging community members to complete a milestone defined at the start of the event. It's a level of accountability that I find exciting as I am notoriously bad at meeting my own deadlines, so I will be participating for sure. So rather than blindly just post about it out of context I wanted to get a blurb up first to set the stage (and also kick off devlogs on here in general).
And for a quick visual, the video below shows the state the project is (mostly) in. This shows the puzzle editor, where I show off saving, loading, and editing of puzzle data. Given the focus on puzzles, I'm going to need to make a lot of them. Building in-game is much easier than manually entering voxel data.
Excited to share more with folks. I plan on posting the actual milestone here once I actually have something semi-solid in place, so expect that probably tomorrow or Friday.
Printing Planners
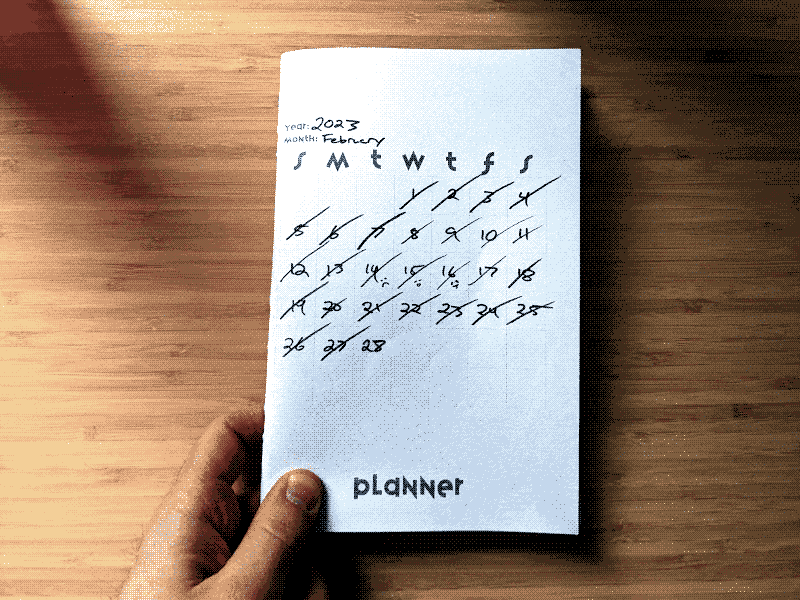
Tuesday, February 28, 2023
Earlier this month I had a lot of little todos piling up and a bunch of deadlines approaching. Historically I haven't been the most organized when it comes to personal tasking, and I could see this problem rearing it's ugly head again with the oncoming deluge of
things-to-doTM
.
I've always kept a notebook lying around so I started trying to list everything I knew I needed to tackle in it so I would be less likely to forget them all. While it worked, I found my notes went from an assortment of doodles and random thoughts to nothing but bulleted lists. While it was good I was getting shit done, I kinda wanted my notebook to be a bit more flexible in it's use. So, I decided to look into picking up a planner. I wanted something with the following:
A calendar
A timeline of things happening in the day-to-day
Space for all my TODOs for the day
Extra space for random notes/journaling/etc.
While I'm sure there's plenty of existing planners that offer all that, I ended up giving up searching for an existing solution and designed one myself as an exercise.
It's been a while since I made anything zine-like, so this was a fun excuse to boot Scribus back up and put a little thing together. I made sure to design it so that I can print one on demand and use it for any month of any year (assuming the modern calendar doesn't change in size anytime soon). Leaving fields blank for year, month, dates, allows me to print as many pages as I might need for a month, fill out the fields by hand, and be good to go for the month.
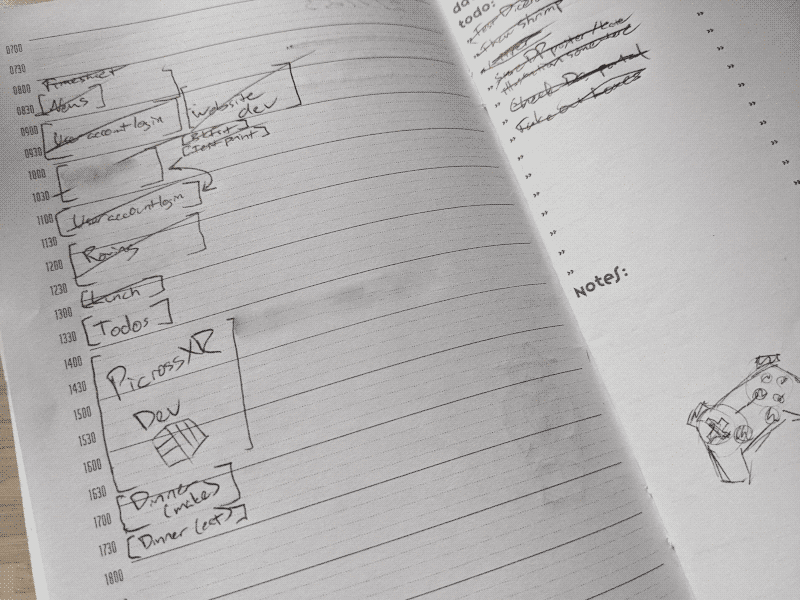
After using one for most of February, I found it to be fairly helpful. As with any new routine, you only get as much out of it as you put into it. When I was regularly blocking out my days it proved (for the most part) incredibly helpful in keeping me on track and accomplishing my goals. When I didn't take the time to fill it out, though, I definitely decreased in productivity/focus. Still, I think it was worthwhile enough for me to print one off for March. I even tried to saddle stich it, since the staples in my February planner didn't quite hold out. It's an ugly first attempt, but if it works out better I'll be doing that every month going forward.
If you're interested in printing your own, you can find the cover and insert PDFs below. I print the cover single-sided on card stock, then print all but the outermost insert page on both sides to ensure each day has room for blocked-out time elements on the left and todos/notes on the right for each day.